Basic Maintenance
Basic Windows Commands
Section titled “Basic Windows Commands”ipconfig /all # Show all network adapter info (IP, MAC, DNS, DHCP)arp -a # Display the ARP cache (IP-to-MAC mappings)ping <destination> # Test connectivity to a host or IP addressipconfig /release # Release current DHCP leaseipconfig /renew # Request new IP address from DHCP serveripconfig /flushdns # Clear DNS resolver cachetracert <destination> # Trace the route packets take to destinationnetstat -ano # Display active connections and listening portsCommon Verification Commands
Section titled “Common Verification Commands”Interface Information
Section titled “Interface Information”# show ip interface brief # Quick interface status overview# show interfaces # Detailed interface statistics# show interfaces status # Port status, VLAN, duplex, speedRouting Information
Section titled “Routing Information”# show ip route # Display routing table# show ip protocols # Show routing protocol info# show running-config | section router # Show routing protocol configConfiguration
Section titled “Configuration”# show running-config # Current active configuration# show startup-config # Saved configuration in NVRAM# show version # IOS version, uptime, hardware infoSwitching
Section titled “Switching”# show mac address-table # Display MAC address table# show vlan brief # VLAN summary# show spanning-tree # STP informationTroubleshooting
Section titled “Troubleshooting”# show cdp neighbors # Directly connected Cisco devices# show cdp neighbors detail # Detailed neighbor information# show arp # Display ARP table# show logging # View system logsBasic Device Configuration
Section titled “Basic Device Configuration”Hostname and Banner
Section titled “Hostname and Banner”(config)# hostname <name>(config)# banner motd #<message>#The banner message appears when users log in to the device.
Console Port Security
Section titled “Console Port Security”Configure password protection and timeout for the console port:
(config)# line console 0(config-line)# password <password>(config-line)# login(config-line)# logging synchronous(config-line)# exec-timeout 5 0- logging synchronous: Prevents log messages from interrupting command input
- exec-timeout 5 0: Logout after 5 minutes of inactivity
Interface Configuration
Section titled “Interface Configuration”(config)# interface <type> <number>(config-if)# ip address <IP> <mask>(config-if)# description <text>(config-if)# no shutdownExample:
(config)# interface gigabitEthernet 0/0(config-if)# ip address 192.168.1.1 255.255.255.0(config-if)# description WAN Link to ISP(config-if)# no shutdownStatic Routing
Section titled “Static Routing”Configure a static route to a specific network:
(config)# ip route <dest_network> <mask> <next_hop_IP>Configure a default route (gateway of last resort):
(config)# ip route 0.0.0.0 0.0.0.0 <gateway_IP>Example:
(config)# ip route 10.0.0.0 255.255.255.0 192.168.1.254(config)# ip route 0.0.0.0 0.0.0.0 203.0.113.1VLAN Configuration
Section titled “VLAN Configuration”Creating VLANs
Section titled “Creating VLANs”(config)# vlan <vlan_number>(config-vlan)# name <vlan_name>(config-vlan)# exitExample:
(config)# vlan 10(config-vlan)# name SALES(config-vlan)# exitAssigning Access Ports
Section titled “Assigning Access Ports”Access ports belong to a single VLAN and connect to end devices:
(config)# interface <interface>(config-if)# switchport mode access(config-if)# switchport access vlan <vlan_number>Example:
(config)# interface fastEthernet 0/1(config-if)# switchport mode access(config-if)# switchport access vlan 10Configuring Trunk Ports
Section titled “Configuring Trunk Ports”Trunk ports carry traffic for multiple VLANs between switches:
(config)# interface <interface>(config-if)# switchport mode trunk(config-if)# switchport trunk allowed vlan <vlan_list>(config-if)# switchport trunk native vlan <vlan_number>Example:
(config)# interface gigabitEthernet 0/1(config-if)# switchport mode trunk(config-if)# switchport trunk allowed vlan 10,20,30(config-if)# switchport trunk native vlan 99Setting up SSH
Section titled “Setting up SSH”Step 1: Configure Hostname and Management Interface
Section titled “Step 1: Configure Hostname and Management Interface”enableconfig terminal
(config)# hostname <hostname>
(config)# interface <interface_name>(config-if)# ip address <IP> <subnet>(config-if)# no shutdown(config-if)# exitExample:
(config)# hostname Router1(config)# interface vlan 1(config-if)# ip address 192.168.1.1 255.255.255.0(config-if)# no shutdown(config-if)# exitStep 2: Create User Accounts and Enable Password
Section titled “Step 2: Create User Accounts and Enable Password”(config)# username <username> secret <password>(config)# enable secret <privileged_mode_password>(config)# service password-encryption- username/secret: Creates local user accounts
- enable secret: Password for privileged EXEC mode
- service password-encryption: Encrypts passwords in the configuration file
Step 3: Generate RSA Keys for SSH
Section titled “Step 3: Generate RSA Keys for SSH”SSH requires a domain name and RSA key pair:
(config)# ip domain-name cisco.com(config)# crypto key generate rsa general-keys modulus 1024(config)# ip ssh version 2- ip domain-name: Required for RSA key generation
- modulus 1024: Key size (use 2048 for better security)
- ip ssh version 2: Enforces SSHv2 (more secure than v1)
Step 4: Configure Console Line
Section titled “Step 4: Configure Console Line”(config)# line con 0(config-line)# login local(config-line)# logging synchronous(config-line)# exit- login local: Uses the local username/password database
Step 5: Configure VTY Lines for Remote Access
Section titled “Step 5: Configure VTY Lines for Remote Access”(config)# line vty 0 4(config-line)# login local(config-line)# transport input ssh(config-line)# logging synchronous(config-line)# login block-for 30 attempts 2 within 120(config-line)# exit- line vty 0 4: Configures 5 simultaneous SSH sessions (0-4)
- transport input ssh: Blocks Telnet, allows only SSH
- login block-for: Blocks login for 30 seconds after 2 failed attempts within 120 seconds
Step 6: Save Configuration
Section titled “Step 6: Save Configuration”(config)# exit# copy running-config startup-configErase Startup Config
Section titled “Erase Startup Config”Step 1: Delete the Saved Configuration
Section titled “Step 1: Delete the Saved Configuration”# erase startup-configThe device will prompt: "Erase of nvram: complete"
Step 2: Reboot the Device
Section titled “Step 2: Reboot the Device”Reboot to start with a blank configuration:
# reloadThe device will prompt: "Proceed with reload? [confirm]"
Copy a Remote Flash File
Section titled “Copy a Remote Flash File”Download IOS Image from TFTP Server
Section titled “Download IOS Image from TFTP Server”# copy tftp: flash:You will be prompted for:
- TFTP server IP address
- Source filename (on the TFTP server)
- Destination filename (on the device flash)
Verify the File Was Copied
Section titled “Verify the File Was Copied”# dir flash:# show flash:Set the Boot Image
Section titled “Set the Boot Image”# boot system flash:/<filename># copy running-config startup-configExample:
# copy running-config startup-configPassword Reset - Memory Register - Router
Section titled “Password Reset - Memory Register - Router”Step 1: Check Current Configuration Register (Optional)
Section titled “Step 1: Check Current Configuration Register (Optional)”Router> enableRouter# show versionNote the Configuration Register value (usually 0x2102)
Step 2: Interrupt the Boot Process
Section titled “Step 2: Interrupt the Boot Process”- Power cycle the router
- Press Ctrl+Break or Ctrl+C within 60 seconds
- This drops you into ROM Monitor Mode (ROMMON)
Step 3: Change the Configuration Register
Section titled “Step 3: Change the Configuration Register”Modify the register to ignore the startup configuration:
rommon 1 > confreg 0x2142Step 4: Reboot the Router
Section titled “Step 4: Reboot the Router”rommon 2 > resetThe router boots without loading the previous configuration.
Step 5: Enter Privileged EXEC Mode
Section titled “Step 5: Enter Privileged EXEC Mode”Router> enableRouter# configure terminalStep 6: Restore the Running Configuration
Section titled “Step 6: Restore the Running Configuration”Set the configuration register back to normal:
Router(config)# config-register 0x2102Router(config)# exitLoad the old configuration (includes interfaces, ACLs, etc.):
Router# copy startup-config running-configStep 7: Change the Password
Section titled “Step 7: Change the Password”Router# configure terminalRouter(config)# enable secret <NEW_SECURE_PASSWORD>Router(config)# username <USER> secret <NEW_USER_PASSWORD>Step 8: Save the Configuration
Section titled “Step 8: Save the Configuration”Router(config)# endRouter# copy running-config startup-configRouter# reloadPassword Reset - Delete Flash Memory - Switch
Section titled “Password Reset - Delete Flash Memory - Switch”Step 1: Enter ROM Monitor Mode (ROMMON)
Section titled “Step 1: Enter ROM Monitor Mode (ROMMON)”- Power cycle the switch
- Immediately hold down the MODE button
- Release the MODE button after the System LED stops flashing amber
Step 2: Initialize Flash Memory
Section titled “Step 2: Initialize Flash Memory”switch: flash_initStep 3: Delete Configuration Files
Section titled “Step 3: Delete Configuration Files”Delete the startup configuration:
switch: del flash:config.textDelete the VLAN database (ensures full factory reset):
switch: del flash:vlan.datStep 4: Reboot the Switch
Section titled “Step 4: Reboot the Switch”switch: bootThe switch will boot without saved configuration and enter the setup dialogue.
Configuration Management
Section titled “Configuration Management”Backup Configuration
Section titled “Backup Configuration”Save the current running configuration to NVRAM:
# copy running-config startup-configBackup configuration to a TFTP server:
# copy running-config tftp:# copy startup-config tftp:You will be prompted for:
- TFTP server IP address
- Destination filename
Restore Configuration
Section titled “Restore Configuration”Load configuration from TFTP to running memory:
# copy tftp: running-configRestore configuration to NVRAM:
# copy tftp: startup-configCompare Configurations
Section titled “Compare Configurations”Compare running configuration vs startup configuration:
# show archive config differencesSetting up PuTTY for Logging
Section titled “Setting up PuTTY for Logging”For logging, it is recommended to run terminal length 0 in Privileged EXEC mode (#). This disables screen pausing features, making it easy to copy large outputs quickly.
# terminal length 0PuTTY Configuration Steps
Section titled “PuTTY Configuration Steps”- Go to Session in PuTTY
- Click Logging
- Select Log all Session output
- Select Browse and choose a location and name the file appropriately (e.g.,
config.txt) - Connect PuTTY Session
- Run relevant commands
SNMP (Simple Network Management Protocol)
Section titled “SNMP (Simple Network Management Protocol)”Create SNMP Community String
Section titled “Create SNMP Community String”The community string acts as a password for SNMP access:
# snmp-server community <name> <ro/rw>- RO (Read Only): SNMP manager can only read device information
- RW (Read Write): SNMP manager can read and modify device configuration
Example:
# snmp-server community PUBLIC ro# snmp-server community PRIVATE rwConfigure SNMP Trap Receiver
Section titled “Configure SNMP Trap Receiver”Point the device to send SNMP traps (alerts) to a management station:
# snmp-server host <host_ip> version <1,2c,3> <community_string>The community string for traps must match on both the device and the SNMP manager.
Example:
# snmp-server host 192.168.1.100 version 2c TRAPCOMMEnable SNMP Traps
Section titled “Enable SNMP Traps”Enable all SNMP trap notifications (SNMPv2c):
# snmp-server enable trapsEnable Specific Trap Types
Section titled “Enable Specific Trap Types”To enable only specific trap types (such as link up/down events):
# snmp-server enable traps <trap-type> <community_string>Common trap types:
- link: Interface up/down events
- config: Configuration changes
- snmp: SNMP-specific traps
- cpu: CPU threshold violations
Example:
# snmp-server enable traps link TRAPCOMMComplete SNMP Configuration Example
Section titled “Complete SNMP Configuration Example”# snmp-server community PUBLIC ro# snmp-server community PRIVATE rw# snmp-server host 192.168.1.100 version 2c TRAPCOMM# snmp-server enable trapsNetwork Time Protocol (NTP)
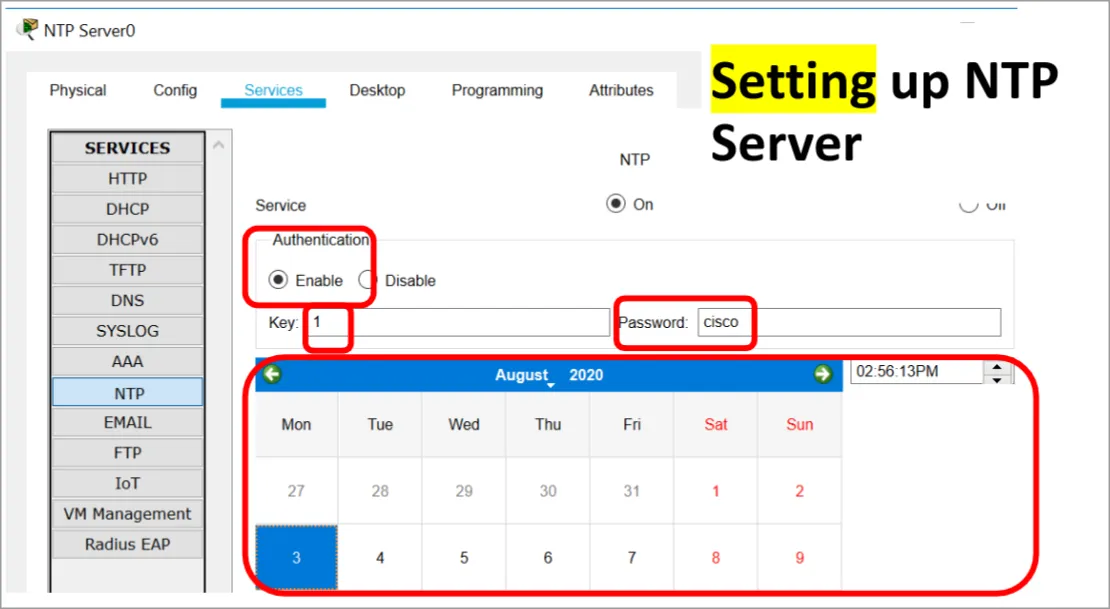
Section titled “Network Time Protocol (NTP)”Configure NTP Server
Section titled “Configure NTP Server”Point the device to synchronize with an NTP server:
(config)# ntp server <server_IP>Example:
(config)# ntp server 129.6.15.28(config)# ntp server 132.163.96.1Enable NTP Authentication (Optional)
Section titled “Enable NTP Authentication (Optional)”(config)# ntp authenticate(config)# ntp authentication-key <1-4294967295> md5 <password>(config)# ntp trusted-key <key_number>Example:
(config)# ntp authenticate(config)# ntp authentication-key 1 md5 MySecretKey(config)# ntp trusted-key 1(config)# ntp server 192.168.1.1 key 1Configure Device as NTP Master (Optional)
Section titled “Configure Device as NTP Master (Optional)”Make the device an authoritative time source:
(config)# ntp master <stratum>Example:
(config)# ntp master 3NTP Verification Commands
Section titled “NTP Verification Commands”Check NTP synchronization status:
# show ntp statusView NTP peer relationships:
# show ntp associationsSetting up NTP (Packet Tracer)
Section titled “Setting up NTP (Packet Tracer)”